This is a question that I always get asked by people who are either new to the hobby, or who are more used to smaller (or even bigger) layouts. The short answer is that it depends on what kind of layout you would like to operate.
My brother in law asked me recently why I didn't have a continuous running layout in my attic, and I replied that I preferred shunting operations. I have the space, but not the inclination.
So, how much space is needed. According to measurements taken from this Hornby track geometry guide, it is possible to get an oval based on first radius curves into a 4x3 foot space. However, this doesn't allow for much of a safety net for falling locos, and if you're planning on putting it under a bed, in a box, then you may find you have trouble with overhanging rolling stock going round the tight corners.
A better size is probably 4x5 feet. This will allow you to use second radius curves, and still have a decent margin around the edge of the baseboard.
Beyond this, those with whole rooms to play with get to play with double ovals, third radius and above curves, and so on.
On the shunting side, shelf layouts (see What's the Ideal Shelf Layout Size) are popular in OO gauge, as they can be transportable and extendable, and don't take up too much space. Even with only 30-40 cm to play with, a decent scenario can be modeled, complete with stations, wayside stops, and industrial areas.
So, there's no simple answer to the question of space, but hopefully these hints have given you a few areas to explore, and discover what would be, for you, the ideal size of layout.
Tuesday 24 September 2013
Thursday 19 September 2013
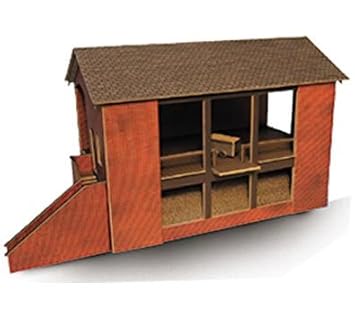
Review : Scalescenes Coaling Stage (R026) - Comparison with Metcalfe, Hornby and Ratio.

The detail is as accurate as we've come to expect from Scalescenes, both inside and out, and is suitably grimy in the right places. It could have benefited from a more weathered look, but that is easily applied with a wash-n-fix with appropriate products.
Of course, it can be printed as OO or N, and comes in several brick finishes.
As is becoming more frequent with these kits, there are also etched windows available from Brassworks, which add to the price, but can make all the difference, especially if, like me, you're a bit clumsy cutting out the window frames!
A final note - for all of you building modern image layouts, and who want to include a deserted, dilapidated, almost ruined coaling stage, this would be an excellent starting point. With the addition of a few boarded up windows, removal of the staircase, and some weeds to add texture, it could be made to look thoroughly tumble-down.
So, either as an in-use, or an ex-use coaling stage, this is a good model; as usual you need to have the patience to either layer up cereal box card, or buy thick card (thereby increasing the price), but the advantages are in the quality, appearance, and size of this kit.
There are alternatives, from Metcalfe, Ratio, Hornby, and Scenecraft, among others, but they just don't look as good.
It is less complete, and looks a bit basic next to the Scalescenes model pictured above. However, if you don't have a decent printer, and want something pre-printed with the correct colors, and which will also probably be the same coloring as other Metcalfe kits already on your layout, it's a good alternative.
On the plastic kit side, and for those who have a smaller layout, with less available space, Ratio's coaling stage looks realistic.

On a similar note, and for those who like red-brick, Hornby also have a reduced size coaling stage, pictured below.
Again, it's basic, but realistic enough to include on most layouts, provided that it is suitably weathered and filled with a coal look-alike to add realism.

All of the products featured here can be found by a simple search on Amazon, or a similar search on eBay.
The eBay product list contains pictures taken by real people of the products on their layouts, which are often a good way to see how they might actually look, so I'd recommend starting there, even if you return to Amazon to buy the actual product.
As always you can use the comment feature to start a conversation with other readers, or simply use the feedback form to email me your thoughts.
Wednesday 18 September 2013
Bachmann Magnetic Uncoupler Options
I've had a few questions about Bachmann couplers recently, so it's maybe time for a quick post just to clear it all up a bit.
It turns out that the Bachmann name gets attached to a lot of stuff - both in the UK/European markets and the US - and this includes products for the OO (Branchline) and HO gauges. One of things that is markedly different is the coupler types that are available for HO and OO.
While these are available in the UK, and they're reasonably cheap, they're not really designed to fit the Branchline rolling stock available over here. Also, fitting them is a bit of a pain, as they don't fit into NEM pockets.
However, they do fit into Bachmann HO models, among others, and would be a great solution for people who are modeling US outline.
In the UK, we've found a cheaper method, that just requires a small tweak to the existing couplings...
If you're not 100% certain what I'm referring to, it's the little "tail" that you can see on the tension lock coupler, and which can only really be hidden by subtle painting and weathering.
This is one of the reasons that people tend towards the knuckle couplings such as Kadee, and away from this (very much cheaper) method.
I'm still testing both - so I'll post some results of my own trials with the various Bachmann magnetic uncoupler options in due course!
It turns out that the Bachmann name gets attached to a lot of stuff - both in the UK/European markets and the US - and this includes products for the OO (Branchline) and HO gauges. One of things that is markedly different is the coupler types that are available for HO and OO.
Bachmann EZ Mate Knuckle Couplers
These are similar in nature to the Kadee knuckle coupler, in that they can be magnetically operated, using the Bachmann EZ Mate magnet (that comes with a little HO scale figure to mark where you put it!) that sits under the track.While these are available in the UK, and they're reasonably cheap, they're not really designed to fit the Branchline rolling stock available over here. Also, fitting them is a bit of a pain, as they don't fit into NEM pockets.
However, they do fit into Bachmann HO models, among others, and would be a great solution for people who are modeling US outline.
In the UK, we've found a cheaper method, that just requires a small tweak to the existing couplings...
The Brian Kirby Method
Of course, I've written about this before, and it's fair to say that it does leave a little trace of itself behind, as can be seen in this video.If you're not 100% certain what I'm referring to, it's the little "tail" that you can see on the tension lock coupler, and which can only really be hidden by subtle painting and weathering.
This is one of the reasons that people tend towards the knuckle couplings such as Kadee, and away from this (very much cheaper) method.
I'm still testing both - so I'll post some results of my own trials with the various Bachmann magnetic uncoupler options in due course!
Tuesday 17 September 2013
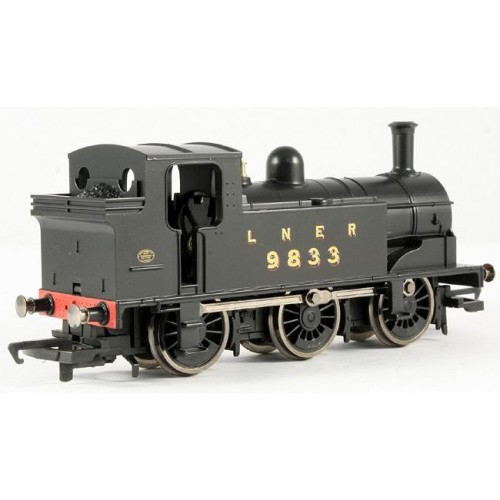
Review of the Hornby R3120X LNER J83 00 Gauge DCC Fitted Steam Locomotive
The R3120X is a Railroad model. It bears stating up front, just so you realise that the price tag will probably reflect the build quality. Usually, Railroad also means D-ring couplings moulded onto a Lima style chassis.
In this case, I was mislead slightly by the Amazon description, which indicates that it has NEM pockets. If this is the case, then they've hidden them well.
I'd err on the side of caution and say that, from the picture below, these are moulded Lima style D-ring couplers, rather than NEM couplings as listed. (If anyone knows differently, please let me know in the comments section!)
Still, it is a handsome J83, at a reasonable price.If you can get it for the 40 - 50 GBP range, including delivery, that is. So, what makes it such a good deal?
For a start, it has DCC fitted. This is a little odd, since as a Railroad model, with D-ring couplings, it is going to most likely find itself on an analogue layout (I would think) rather than a DCC one. And, curiously, that's it's value - it's a great price for a DCC fitted model.
So, where does it fit in on your layout?
Briefly, the J83's were made at the turn of the last century, and lived on through the grouping changes into BR ownership proper. The last J83 was removed from service in the early 1960s.
They were generally used for shunting and short haul of goods. In fact, they were used for mineral trip workings and goods transfer up until 1909. Hornby also sell, in their Railroad range, a pack of three 12T mineral wagons, which would be a good place to start, if creating a layout around this loco.
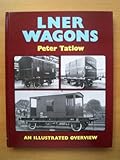 There's also a book by Peter Tatlow, which I've not been able to find new, but which is available second hand, and which covers all the various wagon types that might have been seen behind the J83.
Bachmann do some interesting wagons, such as fish vans, in LNER livery, in the correct era, which would have made sense in and around the Scottish coast. Fitting them would require a change in coupling, of course.
Bachmann also do a 45 ton Bogie Well Wagon, in LNER livery, with a boiler, which could feasibly have been seen being shunted around by a J83 at this time.
Another option is to look at the shed history, post 1930, of these locos. Into the 1930s, they were allocated to sheds (for shunting duties) from which they would, generally, retire.
LNER 9833 was allocated to shed 65A, Eastfield, near Glasgow. Eastfield itself has had a turbulent history, having been destroyed by fire in 1919, used to service up to 200 steam locos after the rebuild, was subsequently closed in 1966, only to re-open in 2004 as a TMD.
If we place 9833 at Eastfield following the fire and rebuild, then a few options come to mind, including shunting around locos that have come in for repair, or for shunting things like the aforementioned LNER bogie plus boiler.
Hopefully that sparks a few likely scenarios, and provides food for thought for what is a well priced, small loco with an interesting history.
(Thanks to LNER.info, and RailUK, among others, for the information.)
In this case, I was mislead slightly by the Amazon description, which indicates that it has NEM pockets. If this is the case, then they've hidden them well.
I'd err on the side of caution and say that, from the picture below, these are moulded Lima style D-ring couplers, rather than NEM couplings as listed. (If anyone knows differently, please let me know in the comments section!)
 |
| (Thanks to Papamallard for the picture) |
Still, it is a handsome J83, at a reasonable price.If you can get it for the 40 - 50 GBP range, including delivery, that is. So, what makes it such a good deal?
For a start, it has DCC fitted. This is a little odd, since as a Railroad model, with D-ring couplings, it is going to most likely find itself on an analogue layout (I would think) rather than a DCC one. And, curiously, that's it's value - it's a great price for a DCC fitted model.
So, where does it fit in on your layout?
Briefly, the J83's were made at the turn of the last century, and lived on through the grouping changes into BR ownership proper. The last J83 was removed from service in the early 1960s.
They were generally used for shunting and short haul of goods. In fact, they were used for mineral trip workings and goods transfer up until 1909. Hornby also sell, in their Railroad range, a pack of three 12T mineral wagons, which would be a good place to start, if creating a layout around this loco.
Bachmann do some interesting wagons, such as fish vans, in LNER livery, in the correct era, which would have made sense in and around the Scottish coast. Fitting them would require a change in coupling, of course.
Bachmann also do a 45 ton Bogie Well Wagon, in LNER livery, with a boiler, which could feasibly have been seen being shunted around by a J83 at this time.
Another option is to look at the shed history, post 1930, of these locos. Into the 1930s, they were allocated to sheds (for shunting duties) from which they would, generally, retire.
LNER 9833 was allocated to shed 65A, Eastfield, near Glasgow. Eastfield itself has had a turbulent history, having been destroyed by fire in 1919, used to service up to 200 steam locos after the rebuild, was subsequently closed in 1966, only to re-open in 2004 as a TMD.
If we place 9833 at Eastfield following the fire and rebuild, then a few options come to mind, including shunting around locos that have come in for repair, or for shunting things like the aforementioned LNER bogie plus boiler.
Hopefully that sparks a few likely scenarios, and provides food for thought for what is a well priced, small loco with an interesting history.
(Thanks to LNER.info, and RailUK, among others, for the information.)
How To Find and Use the Horn Function on Piko Digi Fern Controllers
There's good news and bad news for Piko Digi Fern users when it comes to using the horn function on a loco decoder. The good news is that there are four buttons f1 to f4 on the controller which are used to access special functions on the loco decoder.
 The confusing news from the manual is contained in several phrases. Firstly, that the "lights are switched on with the f0 key and off with the off key."
These keys are located above the f1-f4 keys which are circled in green on the image of the Piko Digi Fern.
The other confusing phrase from the manual is "the keys A to D switch the special functions f1 to f4 on and off." The A to D keys are circled in blue.
The upshot of all this is that I suspect that the function keys can be used to trigger sounds (among other things) that are pre-programmed in the loco decoder. I make this assumption because similar functions like cab lights (on/off) can be operated with these function keys.
However, since the Digi Fern (and this is the bad news) cannot be used to program a decoder, it's a bit hit and miss to figure out which key does what.
By the way, if you need more than 4 function keys, you can use the f+4 button to access functions higher up the order. There's still no guarantee that these will actually activate something, but that's all part of the trial and error game that is the Piko Digi-Fern.
The first step is to make sure that you're actually controlling the right loco, by selecting the correct transmission channel (with buttons A to D) and keying a known function. For example, press the loco key (it's top-leftmost on the Piko remote) and follow that with the loco address, and the desired function - say the + button to increase speed.
Cancel that operation, so you have a stationary loco, and can proceed to test the various f buttons.
Although the documentation states that the system will 'remember' the last loco that was used, I prefer to key the loco address each time when I'm doing trial and error operations.
So, key loco + address + f(n) and see what happens. Write down what happens, even if it's nothing. An easy test to make sure that the decoder accepts these functions is to start with f0 and off, which should enable you to turn the lights on and off.
Eventually, you should find the horn function, but without any way to visually see what you're doing, there's no actual guarantee! I'm personally saving up for something like the Sprog3 or z21 before I get into advanced functions like sound!
How To Convert Rapido to Micro Train Couplers : A Simple Guide
In the world of US N scale modeling there are essentially two choices of modern couplers - Rapido and Micro-Trains - which represents something of a consolidation of a collection of proprietary couplings that grew up over the years.
There are other manufacturers, Atlas and Kato among them, who have couplings that surpass Rapido and match Micro-Trains for functionality, but which haven't achieved the same acceptance for aesthetic reasons.
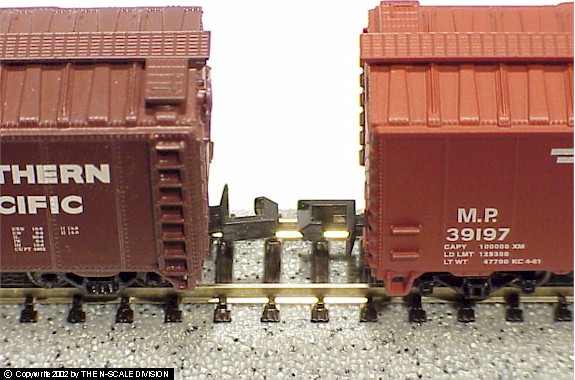 On the left, courtesy of the N Scale Division web site, is an example of the Rapido style coupling, in open position.
Modelers like neither the look, nor the functionality of these couplings, which hark back to the early days of N scale modeling.
Micro-Trains couplings, now re-branded as Kadee, satisfy in both areas - they look the part (i.e. they are prototypical) and also allow advanced functionality such as delayed uncoupling (pre-coupling) which let modelers perform complex switching and shunting maneuvers.
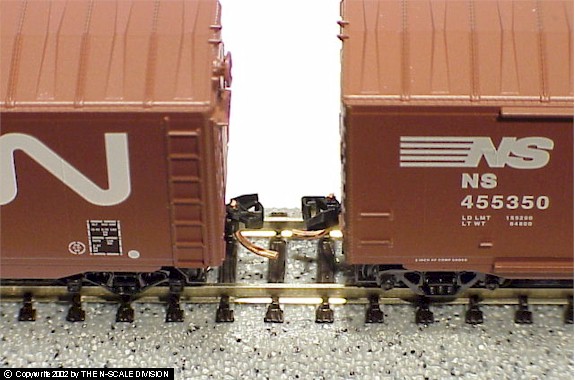 The image on the right, again from the N Scale Division web site, shows the Kadee/Micro-Trains couplers mounted on the same (or similar) wagons as the Rapido image above.
They are known as knuckle couplers, and while they're not the only ones on the market, they have become the market leader.
So, now that we're all on the same page, what happens when you have Rapido style couplers, but you want Kadee/Micro-Trains?
In the US, there are two decisions to make - which models of Micro-Trains coupler to buy (there are several kinds) and how to actually fit them. Starting with the first, the Micro-Trains web site has a great list of all the various products that they make, and how they map to various rolling stock manufacturers.
Depending on the year, model, and whether it's a locomotive or a wagon, removing the old couplings ranges from easy (pop out) to medium (unscrew and pop out) through to hard (cut-off.) Luckily, Micro-Trains have mounting kits available that help you out if you need to go with the hard way.
These mounting kits also have little glue-on feet and come with gauges so that you can get the height exactly right (no mean feat) and they make the entire process as easy as possible.
Before you actually get out a craft knife, though, do check if you can remove the body from the chassis, and pop out the existing coupling!
In Europe, things are a little easier, as we have something called the NEM standards, which all manufacturers are supposed to adhere to. They cover everything from DCC operation, to the exact height and length of various coupling types.
Most modern rolling stock from the likes of Graham Farish has NEM pockets that can take any kind of compatible coupling on the market - Kadee/Micro-Trains included. The old couplings just pop out, and the new ones slide in.
Of course, older rolling stock, and those with proprietary moulded couplings will need to be dealt with the hard way - with a craft knife and conversion kit. But, with practice, it becomes easier. I've documented the process for OO conversions in a previous blog post.
There are other manufacturers, Atlas and Kato among them, who have couplings that surpass Rapido and match Micro-Trains for functionality, but which haven't achieved the same acceptance for aesthetic reasons.
Modelers like neither the look, nor the functionality of these couplings, which hark back to the early days of N scale modeling.
Micro-Trains couplings, now re-branded as Kadee, satisfy in both areas - they look the part (i.e. they are prototypical) and also allow advanced functionality such as delayed uncoupling (pre-coupling) which let modelers perform complex switching and shunting maneuvers.
The image on the right, again from the N Scale Division web site, shows the Kadee/Micro-Trains couplers mounted on the same (or similar) wagons as the Rapido image above.They are known as knuckle couplers, and while they're not the only ones on the market, they have become the market leader.
So, now that we're all on the same page, what happens when you have Rapido style couplers, but you want Kadee/Micro-Trains?
In the US, there are two decisions to make - which models of Micro-Trains coupler to buy (there are several kinds) and how to actually fit them. Starting with the first, the Micro-Trains web site has a great list of all the various products that they make, and how they map to various rolling stock manufacturers.
Depending on the year, model, and whether it's a locomotive or a wagon, removing the old couplings ranges from easy (pop out) to medium (unscrew and pop out) through to hard (cut-off.) Luckily, Micro-Trains have mounting kits available that help you out if you need to go with the hard way.
These mounting kits also have little glue-on feet and come with gauges so that you can get the height exactly right (no mean feat) and they make the entire process as easy as possible.
Before you actually get out a craft knife, though, do check if you can remove the body from the chassis, and pop out the existing coupling!
In Europe, things are a little easier, as we have something called the NEM standards, which all manufacturers are supposed to adhere to. They cover everything from DCC operation, to the exact height and length of various coupling types.
Most modern rolling stock from the likes of Graham Farish has NEM pockets that can take any kind of compatible coupling on the market - Kadee/Micro-Trains included. The old couplings just pop out, and the new ones slide in.
Of course, older rolling stock, and those with proprietary moulded couplings will need to be dealt with the hard way - with a craft knife and conversion kit. But, with practice, it becomes easier. I've documented the process for OO conversions in a previous blog post.
Tuesday 3 September 2013
Building a Layout Around the Southern Railway 2-BIL EMU
 |
| Hornby 2-BIL EMU |
It turns out that it might not be 100% appropriate (and also that my skills aren't quite good enough yet to do it justice) but I thought I'd share my research with you.
So, from the top - the 2-BIL units were built from 1935 to 1938, and were DC third rail EMUs. They lasted into the 1970s, under the TOPS Class 401 allocation. If you ever wanted to see one in the flesh, the only preserved example is in the National Railway Museum, in York, according to the Southern Electric website.
Looking at photos, it looks as if the Metcalfe Signal Box

To further research this, before buying any extra buildings, I'd need to consult something like Modelling the Southern, an excellent book by Jeremy English. It's subtitled 'Ideas and Inspiration' and would help to avoid any serious faux pas.
My initial idea was to have the passenger component running on an auto-shuttle, something like the Gaugemaster SS-1, and then have a DCC based interactive shunting part based around some kind of goods yard or scrap metal merchant.
Since I'm pretty much a diesel fan, that leaves only the Class 12 of the three diesels that were built by the Southern Railway company. The other two were retired and cut up before the 1970 cut-off date that I'm envisaging.
However, I can't seem to find anyone who makes the Class 12; the closest I can get is the Class 08, which would have to be re-engineered a little to become a Class 12, if indeed it's possible. This is one of the reasons I've decided not to go the SR route at this time.
Examples of other Southern Railway rolling stock
 As for layout ideas, I was also wondering if something like this Mile by Mile book might have been a good source of inspiration, had I decided to stay with the topic.
I'm a fan of research, and this book, covering the railway in 1947 would have been a good source of historical information pertaining to the use of the railway, and its original
Another good book for helping research is the Southern Railway Handbook, which I still plan on purchasing as it will no doubt come in handy in the future since it covers the whole period from 1923 to 1947, complete with pictures.
 What I'm really hoping for with this book is a good background in the steam/diesel transition years, which is a period that I hope to model into an exhibition quality shelf layout, once I've honed my skills on my current projects.
For more information about either of these titles, just click the images.
Other ideas for a Southern Railway layout might include coastal operations, such as various imported goods that would come into the UK by way of the various ports.
The nature of these goods will depend on the era. Perhaps a more easily accessible prototypical freight operation would include cattle and milk. A good initial source of information for Southern Railway modellers is the Wikipedia article on the topic.
Have fun!
Monday 2 September 2013
Locking Device For OO Scale Sector Plate
A sector plate is a great way to store and select rolling stock in a fiddle yard. The blog article "Sector Plates : A Space Saving Tip for all Scales" goes into the whys, wheres and hows in more detail, but one thing that isn't really covered is the provision of a locking device for the sector plate.
A locking device needs to be able to fulfill two important roles:
The reason for the second role is that the rails on the plate are separate from the main line, and since the sector plate moves, allowing selection between one or more lines, supplying power to the track on the plate might be an issue.
The plate itself can contain more than one length of track, and the tracks on the plate can feed one or more lengths of track. Probably the most common arrangement is to have an on-scene track run onto the sector plate, which is then used to transfer rolling stock from the plate to one or more tracks that are off-scene.
Less frequently, the rolling stock can be 'stored' on the sector plate, but this makes it a bit heavy to move smoothly due to the added weight.
When the tracks are aligned, they should be locked into place to drive the train on or off the sector plate, and one of the best ways to do this is to use a humble sliding bolt lock. These have different names in different countries, but you're looking for something that has a part that is usually fitted to a door, and a part that slides into it.
The idea is that this will both lock the sector plate, and hence the track, into place, and also provide circuit completion to supply power to the sector plate track. Of course, you still need to provide one side of the circuit fixed to the sector plate, but having the bolt provide the other is an easy way to complete the circuit connection.
Different gauges will use different size sliding bolt locks, but the technique ought to be good across all scales, with the bolt mounted under or on top of the baseboard. Luckily, because the sector plate is mainly a fiddle yard device, you shouldn't need to camouflage the bolt if you choose to mount it on top of the baseboard.
A locking device needs to be able to fulfill two important roles:
- prevent the sector plate from moving once the rails are lined up
- supply power to the rails on the plate
The reason for the second role is that the rails on the plate are separate from the main line, and since the sector plate moves, allowing selection between one or more lines, supplying power to the track on the plate might be an issue.
The plate itself can contain more than one length of track, and the tracks on the plate can feed one or more lengths of track. Probably the most common arrangement is to have an on-scene track run onto the sector plate, which is then used to transfer rolling stock from the plate to one or more tracks that are off-scene.
Less frequently, the rolling stock can be 'stored' on the sector plate, but this makes it a bit heavy to move smoothly due to the added weight.
When the tracks are aligned, they should be locked into place to drive the train on or off the sector plate, and one of the best ways to do this is to use a humble sliding bolt lock. These have different names in different countries, but you're looking for something that has a part that is usually fitted to a door, and a part that slides into it.
The idea is that this will both lock the sector plate, and hence the track, into place, and also provide circuit completion to supply power to the sector plate track. Of course, you still need to provide one side of the circuit fixed to the sector plate, but having the bolt provide the other is an easy way to complete the circuit connection.
Different gauges will use different size sliding bolt locks, but the technique ought to be good across all scales, with the bolt mounted under or on top of the baseboard. Luckily, because the sector plate is mainly a fiddle yard device, you shouldn't need to camouflage the bolt if you choose to mount it on top of the baseboard.
Subscribe to:
Posts (Atom)